In this Microsoft Intune and Graph API for PowerShell article, we will create an Anti-Virus policy in Intune using PowerShell.
Anti-Virus
The Microsoft Defender for Endpoint Anti-Virus policy offers real-time protection against antimalware and other threats. The policy contains 20 configurable settings for Windows 10/11 machines which include:
- Enable behaviour monitoring
- Enable real-time monitoring
- Enable Network inspections
- Scan downloads
- Scan scripts loaded from IE
- Block user access to MDE client
- MDE signature update
- Monitor file activity
- Configure days before files in quarantine are deleted
- Max CPU usage during a scan
- Scan archive files
- Scan emails
- Scan removable drives
- Scan-mapped network drives
- Scan Network files
- Enable cloud protection
- Block level
- Sample submission configuration
- Schedule quick scan
- Schedule full scan
- Scan type
Connect to Graph API
Connecting to Intune and MDE using Graph API is not as simple as running and using Azure PowerShell. To connect to Graph API with the Graph API for the PowerShell module, we need to connect using a certificate.
Please visit this post to configure your machine to connect using a certificate.
Connect to Microsoft Graph API using a Certificate from Linux
Make sure you create an App Registration with Intune permission as well using the following post
Create Azure App Registration Using Azure CLI
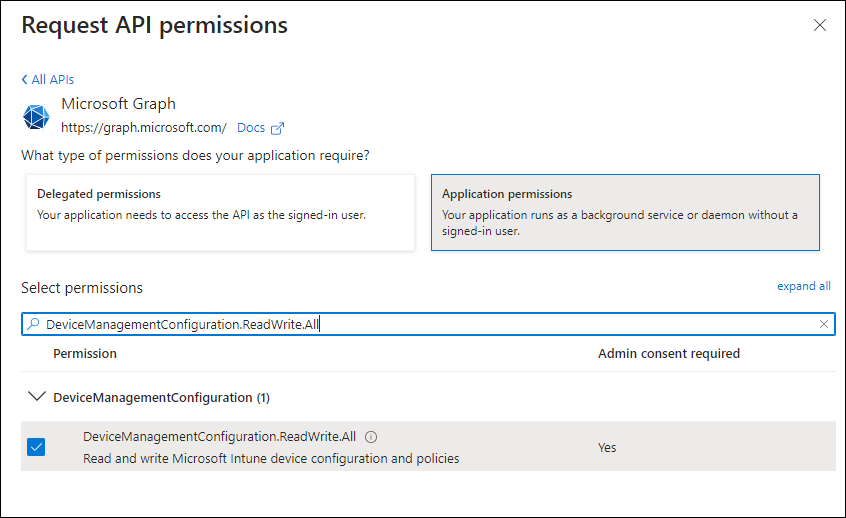
To create the policy, you will need the following API permissions
PowerShell Script
Once you are connected to the Graph API using a certificate and have all the proper permission, you can go ahead and run the PowerShell script below and configure an Anti-Virus policy.
Import-Module Microsoft.Graph.DeviceManagement


$config = @{
	"@odata.type" = "#microsoft.graph.windows10GeneralConfiguration"
	description = "MDE Anti-Virus Policy"
	displayName = "MDE Anti-Virus Policy - Graph API"
	version = 7
	defenderRequireRealTimeMonitoring = $true
	defenderRequireBehaviorMonitoring = $true
	defenderRequireNetworkInspectionSystem = $true
	defenderScanDownloads = $true
	defenderScanScriptsLoadedInInternetExplorer = $true
	defenderBlockEndUserAccess = $true
	defenderSignatureUpdateIntervalInHours = 3
	defenderMonitorFileActivity = "disable"
	defenderDaysBeforeDeletingQuarantinedMalware = 12
	defenderScanMaxCpu = 2
	defenderScanArchiveFiles = $true
	defenderScanIncomingMail = $true
	defenderScanRemovableDrivesDuringFullScan = $true
	defenderScanMappedNetworkDrivesDuringFullScan = $true
	defenderScanNetworkFiles = $true
	defenderRequireCloudProtection = $true
	defenderCloudBlockLevel = "high"
	defenderPromptForSampleSubmission = "alwaysPrompt"
	defenderScheduledQuickScanTime = "23:00"
	defenderScanType = "disabled"
	defenderSystemScanSchedule = "everyday"
    defenderScheduledScanTime = "00:00:00.00"
    defenderDetectedMalwareActions = @{
		"@odata.type" = "microsoft.graph.defenderDetectedMalwareActions"
		lowSeverity = "clean"
		moderateSeverity = "clean"
		highSeverity = "clean"
		severeSeverity = "clean"
	}


}


New-MgDeviceManagementDeviceConfiguration -BodyParameter $config -Verbose
Output and Confirmation
If the command and permission are correct, your output should look like this:
Id                                   CreatedDateTime     Description           DisplayName                       LastModifiedDateTime Version
--                                   ---------------     -----------           -----------                       -------------------- -------
 08/04/2023 03:03:21 MDE Anti-Virus Policy MDE Anti-Virus Policy - Graph API 08/01/2023 03:03:21  1
In the Intune portal, the configuration should look like this.
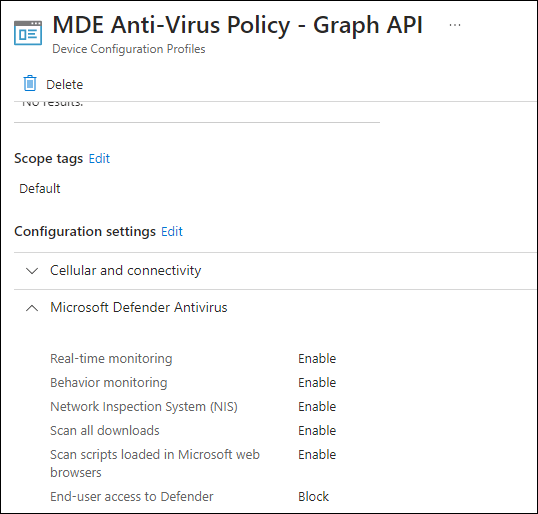
.